Serverless Backend with Terraform
05 April, 2021
In this blog we take go through how to set up a serverless backend in AWS using Terraform.
Source code is available on Github.
Prerequisites
- AWS account + IAM role with programmatic access
- Terraform installed and configured
What is serverless architecture?
Serverless computing (or Faas – Functions as a service) referes to a consept where the underlying server infrastructure running your code is abstracted away.
Consider this description from the AWS documentation:
“AWS Lambda is a compute service that lets you run code without provisioning or managing servers. Lambda runs your code only when needed and scales automatically, from a few requests per day to thousands per second. You pay only for the compute time that you consume—there is no charge when your code is not running.”
This approach is cost efficient and scales well. You only pay for the function invocations (CPU-time + memory used) instead of a fixed hourly price.
What is Terraform?
Terraform is a declarative, high level IaC (Infrastructure as Code) tool used for infrastructure management.
You write configuration files that describe the desired state of the infrastructure using a high-level configuration language, and Terraform is in charge of figuring out how to provision those resources in the cloud.
This makes your cloud infrastructure versioned, documented, and reusable.
Example application introduction
The example application we are deploying the serverless backend for is called “scottquotes” – an online compendium of the all-time greatest Michael Scott quotes.
Below is an extremely fancy, high level architecture plan for the application.
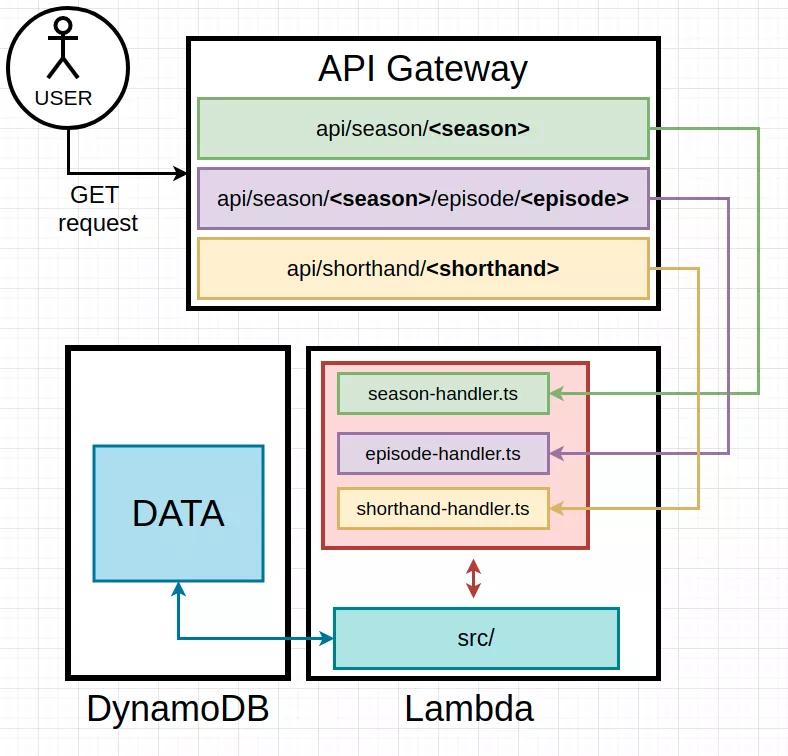
The application is going to return quotes either by season, a specific episode, or a “shorthand”.
There will be an API-Gateway deployment that receives the requests, and proxies them to the appropriate lambda backend. Lambda functions will have a handler for each of the endpoints, as well as an src/ folder for shared application code. Data is fetched from DynamoDB.
Consider reading this article on Lambda basics to better understand the flow of this application.
Basic terraform setup
Start by creating a project folder and required Terraform files:
$ mkdir scottquotes && cd scottquotes/
$ touch main.tf variables.tf
Define all the variables we are going to need:
// variables.tf

# default region
variable "region" {
    type = "string"
    default = "eu-north-1"
}

# account id
variable "accountId" {
  type = "string"
  default = "[REDACTED]"
}

# aws profile to use (~.aws/credentials)
variable "profile" {
    type = "string"
    default = "default"
}

# project name
variable "name" {
  type = "string"
  default = "scottquotes"
}
Add a “provider” block to main.ft
# provider block
# ==============================================================
provider "aws" {
    profile = var.profile
    region = var.region
}
Terraform works with multiple different cloud providers, so the provider block is used to inform Terraform that we want to specifically use AWS.
VPC and subnets
Since we are operating on AWS, the first thing we should define is the VPC and subnets. AWS gives you a default VPC and 3 subnets per region.
Let’s tell Terraform to start tracking them:
# import default subnets and VPC
# NOTE: these are not created or managed by terraform!
# ==============================================================
resource "aws_default_vpc" "default" {
    tags = {
      name = "default VPC"
    }
}

resource "aws_default_subnet" "default-subnet-az-a" {
    availability_zone = var.az["a"]
    tags = {
      name = "default subnet a"
    }
}

resource "aws_default_subnet" "default-subnet-az-b" {
    availability_zone = var.az["b"]
    tags = {
      name = "default subnet b"
    }
}

resource "aws_default_subnet" "default-subnet-az-c" {
    availability_zone = var.az["c"]
    tags {
      name = "default subnet c"
    }
}
The above resources are using an az variable to map availability zones to subnets, so that needs to be added to variables.tf
Replace your subnet AZ x parts with your default subnet availability zones:
# default subnet mappings
variable "az" {
    type = "map"
    default = {
        "a" = "<your subnet AZ a>",
        "b" = "<your subnet AZ b>",
        "c" = "<your subnet AZ c>"
    }
}
Lambdas
We want three lambda functions, that will be mapped to our three API-endpoints. Additionally, we also need an IAM-role for the lambda functions to use:
# Lambda
# ==============================================================
resource "aws_iam_role" "lambda_iam_role" {
  name = "iam_for_lambda"

  assume_role_policy = <<EOF
{
  "Version": "2012-10-17",
  "Statement": [
    {
      "Action": "sts:AssumeRole",
      "Principal": {
        "Service": "lambda.amazonaws.com"
      },
      "Effect": "Allow",
      "Sid": ""
    }
  ]
}
EOF
}

resource "aws_lambda_function" "shorthand" {
    role = aws_iam_role.lambda_iam_role.arn
    filename = "dummy.zip"
    function_name = "shorthand-handler"
    handler = "lambda/shorthand-handler.handler"
    runtime = "nodejs12.x"
}

resource "aws_lambda_function" "season" {
    role = aws_iam_role.lambda_iam_role.arn
    filename = "dummy.zip"
    function_name = "season-handler"
    handler = "lambda/season-handler.handler"
    runtime = "nodejs12.x"
}

resource "aws_lambda_function" "episode" {
    role = aws_iam_role.lambda_iam_role.arn
    filename = "dummy.zip"
    function_name = "episode-handler"
    handler = "lambda/episode-handler.handler"
    runtime = "nodejs12.x"
}
Let’s go over the lambda settings:
roleis a reference to the IAM role used to run the lambdasfilenameis a path to a zip-file that contains the code to be deployed to this lambda function. Empty dummy file is being used here.function_namename of the functionhandlerpath to our lambda handler file relative to your zipped folder structure + the function name of the handler. This is only relevant if you plan on using Terraform to deploy the code moving forward.runtimeRuntime definition for your code. List of available runtimes can be found here
APIGateway
For this project we need three different endpoints. Brackets signify a path-parameter.
/api/season/{season} - return all quotes for a season
/api/season/{season}/episode/{episode} - return quotes for a specific episode
/api/shorthand/{shorthand} - return quotes for a specific episode via a shorthand (e.g. S2E8)
First lets define the base APIGateway resource and the base /api/ path-part that is going to prefix every url:
# APIGW
# ==============================================================
resource "aws_api_gateway_rest_api" "api" {
    name = "${var.name}-backend-api"
}

# prefix all paths with /api/
resource "aws_api_gateway_resource" "base-path" {
    rest_api_id = aws_api_gateway_rest_api.api.id
    parent_id  = aws_api_gateway_rest_api.api.root_resource_id
    path_part  = "api"
}
NOTE!
path_part value should not contain any forward-slashes, APIGateway will handle those internally.
Now that we have the base /api path defined, we can start adding path parts to it:
# /shorthand endpoint
resource "aws_api_gateway_resource" "shorthand" {
    rest_api_id = aws_api_gateway_rest_api.api.id
    parent_id  = aws_api_gateway_resource.base-path.id
    path_part  = "shorthand"
}

resource "aws_api_gateway_resource" "shorthand-value" {
    rest_api_id = aws_api_gateway_rest_api.api.id
    parent_id = aws_api_gateway_resource.shorthand.id
    path_part = "{shorthandValue}"
}
The curly brackets in {shorthandValue} tell API Gateway that this path-part should be treated as a path-parameter.
API Gateway will expose any and all path parameters to us automatically when the request is proxied to lambda.
Now that we have an endpoint, let’s define a HTTP-method for it:
resource "aws_api_gateway_method" "shorthand-get" {
    rest_api_id = aws_api_gateway_rest_api.api.id
    resource_id = aws_api_gateway_resource.shorthand-value.id
    http_method = "GET"
    authorization = "NONE"
}
This API will be public, so authorization is not necessary.
If you have the need to restrict access to your API, the list of available authorization methods can be found here.
Now to add the lambda integration:
resource "aws_api_gateway_integration" "shorthand-get-integration" {
    rest_api_id = aws_api_gateway_rest_api.api.id
    resource_id = aws_api_gateway_resource.shorthand-value.id
    http_method = aws_api_gateway_method.shorthand-get.http_method

    integration_http_method = "POST"
    type = "AWS_PROXY"
    uri = aws_lambda_function.shorthand.invoke_arn

    depends_on = [ aws_api_gateway_method.shorthand-get ]
}
NOTE!
When targeting lambda via AWS_PROXY the integration_http_method must always be set to POST regardless of the method that is used to invoke the API-endpoint.
URI defines the target AWS resource we want to proxy the HTTP event to – in this case it’s our lambda function.
Grant APIGateway permission to invoke this particular lambda function:
# permissions for APIGW to invoke lambda
resource "aws_lambda_permission" "shorthand-lambda-permission" {
    statement_id = "AllowExecutionFromAPIGateway"
    action = "lambda:InvokeFunction"
    function_name = "arn:aws:lambda:${var.region}:${var.accountId}:function:${aws_lambda_function.shorthand.function_name}"
    principal = "apigateway.amazonaws.com"
    source_arn = "${aws_api_gateway_rest_api.api.execution_arn}/*/*/*"

    depends_on = [ aws_lambda_function.shorthand ]
}
Let’s go over the resource parameters:
statement_idOptional statement identifier. This is normally generated from context by TerraformactionAWS lambda action(s) to be allowedfunction_nameName of the lambda function you want to allow execution onprincipalValid AWS pricipal to receive permissions. In this case it’s APIGatewaysource_arnOptional resource definition within the chosen principal to receive the permissions. The/*/*/*part stands for APIGateway stage, endpoint, methoddepends_onTerraform will wait to create this resource until dependecies are fulfilled.
That’s it for the shorthand endpoint.
We have now defined an endpoint /api/shorthand/{shorthand} that upon receiving a POST request will invoke a lambda function defined in the integration resource.
I won’t go through the other endpoints, as they follow the same exact logic as the shorthand endpoint (you can look at the source code in Github if needed).
Finally an API deployment and stage need to also be defined. Stages in APIGateway refer to a snapshot of a pre-existing API, that will be made available with callable endpoint URL’s.
# APIGateway deployment
resource "aws_api_gateway_deployment" "deployment" {
    rest_api_id = aws_api_gateway_rest_api.api.id
    stage_name = ""

    lifecycle {
      create_before_destroy = true
    }

    depends_on = [
      aws_api_gateway_integration.season-get-integration,
      aws_api_gateway_integration.episode-get-integration,
      aws_api_gateway_integration.shorthand-get-integration
    ]
}

resource "aws_api_gateway_stage" "stage" {
    stage_name = "${var.name}-backend-api"
    rest_api_id = aws_api_gateway_rest_api.api.id
    deployment_id = aws_api_gateway_deployment.deployment.id
}
Terraform documentation recommends you add all the API resources as dependencies to aws_api_gateway_deployment, as well as adding a lifecycle policy in order to work around some issues described here.
DynamoDB
This one is really simple. We just want to have a single table to store all the quotes in.
As long as the amount of data in this example table stays relatively small, you should be able to stay within the free-tier. Otherwise it is highly recommended to read through the DynamoDB docs and define a proper schema, as when used incorrectly it can get expensive pretty fast.
# DynamoDB
# ==============================================================
resource "aws_dynamodb_table" "scottquotes" {
   name           = "scottquotes"
   billing_mode   = "PROVISIONED"
   read_capacity  = 25
   write_capacity = 25
   hash_key       = "shorthand"

   attribute {
     name = "id"
     type = "S"
   }
}
Terraform backend
Before deploying the infrastructure, let’s create a backend for the Terraform state to live in.
A “state” in Terraform is a file that is used to store the state of your infrastructure, and is vital for Terraform to work.
You could store the state files on your local machine, but that might lead to problems if someone else wants to modify the infrastructure (or if you accidentally delete the file). Git could be used to store the state, but this approach will lead to issues if multiple people/branches have different versions of the state file that may not match reality.
Both of these problems are eliminated by using a centralized, real-time updating store for the state files called Backends
Create a new private S3 bucket by hand, and then add it’s information to a backend resource at the top of the main.tf file:
# TF backend
# ==============================================================
terraform {

    backend "s3" {
      bucket = "scottquotes-tf-backend"
      key = "scottquotes-tf-backend/terraform.tfstate"
      region = var.region
    }
}
Terraform will now read and write the state of your infrastructure into this S3-bucket, instead of the local system.
NOTE!
If you have multiple people working with the same Terraform states, you should absolutely add a lock for the state file as described here.
Run deployment
Now that all the infrastructure has been defined, it’s time to deploy.
Start by initializing terraform:
$ terraform init

Initializing the backend...

Successfully configured the backend "s3"! Terraform will automatically
use this backend unless the backend configuration changes.

Initializing provider plugins...
- Finding latest version of hashicorp/aws...
- Installing hashicorp/aws v3.34.0...
- Installed hashicorp/aws v3.34.0 (signed by HashiCorp)

...

Terraform has been successfully initialized!
You can now run terraform plan to see what will be deployed:
$ terraform plan

An execution plan has been generated and is shown below.
Resource actions are indicated with the following symbols:
  + create

[List of stuff to be created]

Plan: 26 to add, 0 to change, 0 to destroy.

------------------------------------------------------------------------

Note: You didn't specify an "-out" parameter to save this plan, so Terraform
can't guarantee that exactly these actions will be performed if
"terraform apply" is subsequently run.
Terraform has parsed the configurations files, and verified that they are in order.
Before deploying these resources, a dummy.zip file needs to be created, because we specified it in the lambda function blocks. Without the file, terraform will throw an no such file or directory exception.
$ echo "console.log('hello world')" > foo.js && zip dummy.zip foo.js && rm foo.js
Note that Terraform will throw an error if the file cannot be uncompressed – it really has to be a zip file!
Run Terraform apply:
$ terraform apply --auto-approve
aws_default_subnet.default-subnet-az-a: Creating...
aws_default_subnet.default-subnet-az-c: Creating...
aws_iam_role.lambda_iam_role: Creating...
aws_default_subnet.default-subnet-az-b: Creating..

...

aws_api_gateway_stage.stage: Creating...
aws_api_gateway_stage.stage: Creation complete after 0s [id=ags-sa22lemynh-contactor-backend-api]

Apply complete! Resources: 28 added, 0 changed, 0 destroyed.
Everything should work out of the box, but if not, then Terraform generally has pretty good error messages for debugging the configuration.
When you want to destroy the resources:
$ terraform destroy --auto-approve
Conclusion
In this blog post we went over how to define cloud infrastructure as code for an example application using Terraform.
Actually uploading some working code to Lambda is left as an exercise to the reader.